 +7 (812) 4-673-673
Configuring AIS T-105 transceiver class A
21.07.2015
Configuring AIS T-105 transceiver class A
After all connections have been made, you can connect the transceiver to the power supply and configure it for operation. During tuning, the information on the ship on which it is installed is entered in the transceiver. When entering such information, it is important to maintain accuracy, as it will be transferred to other vessels equipped with AIS, as well as to shore stations. After completing the settings, the installation log described below must be completed and stored on board the vessel. Checks before making the settings Before setting up, you must ensure that the following procedures are completed:
Configure vessel identification information
Before operation, the transceiver must be set up in accordance with the information on the ship on which it is installed. You must enter the following information:
Setting up the internal GNSS receiver The internal GNSS
receiver can be configured to operate in one of three modes:
In case the data of the external GNSS receiver is not available, it is possible to configure the T105 so that data from the internal GNSS of the receiver is output to the data port of the external display system and to the pilot port. The configuration is carried out using the 'configAIS' software supplied with the T105.
Setting up flight data
Before starting operation, you need to configure the transceiver information about the flight. You must enter the following information:
Confirmation of correctness of operation
After the introduction of vessel identification data and flight data, the transceiver starts normal operation. To complete the installation, the following validation check must be carried out:
Article The purpose of the AIS can be read here >> " Appointment of the AIS "
After all connections have been made, you can connect the transceiver to the power supply and configure it for operation. During tuning, the information on the ship on which it is installed is entered in the transceiver. When entering such information, it is important to maintain accuracy, as it will be transferred to other vessels equipped with AIS, as well as to shore stations. After completing the settings, the installation log described below must be completed and stored on board the vessel. Checks before making the settings Before setting up, you must ensure that the following procedures are completed:
- The transceiver is fixed on the ship
- VHF and GNSS antennas are installed and connected to the transceiver
- The data cable is connected to the transceiver and the terminal box
- The sensors of the vehicle and the imaging equipment attached to the AIS are connected to the terminal box
- The power is connected to the transceiver, and the transceiver functions (the display is working).
Configure vessel identification information
Before operation, the transceiver must be set up in accordance with the information on the ship on which it is installed. You must enter the following information:
- MMSI is the MMSI number of the vessel (Maritime Mobile Service Identifier), which is usually indicated in the ship's VHF ship license and must be the same as the MMSI number used for VHF / CIVradio exchange.
- Title - Ship name (maximum 20 characters)
- Call sign - Radio call sign of the ship (no more than 7 symbols)
- IMO number - IMO identification number of the vessel (if any)
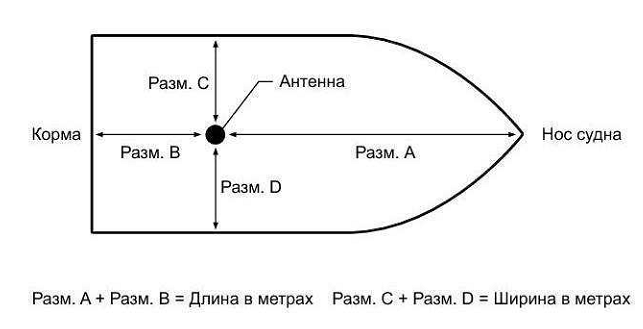
- Dimensions taking into account the location of the GNSS antenna connected to the AIS transceiver (internal GNSS)
- Dimensions describing the location of the GNSS antenna connected to any external position detection source connected to the AIS transceiver
Setting up the internal GNSS receiver The internal GNSS
receiver can be configured to operate in one of three modes:
- GLONASS and GPS - in this mode, position fixing is performed in parallel both in the GLONASS network and in the GPS network. This mode is set by default and provides the best performance.
- GPS - in this mode only GPS satellites are used to fix the location.
- GLONASS - in this mode only GLONASS satellites are used to fix the location.
In case the data of the external GNSS receiver is not available, it is possible to configure the T105 so that data from the internal GNSS of the receiver is output to the data port of the external display system and to the pilot port. The configuration is carried out using the 'configAIS' software supplied with the T105.
Setting up flight data
Before starting operation, you need to configure the transceiver information about the flight. You must enter the following information:
- Navigation status - is selected from the list below, must be current and be changed manually in accordance with changes in the actual navigation status of the vessel.
○ (0) on the move with the application. the engine;
○ 1 at anchor;
○ 2 is not under the command;
○ 3 maneuverability is limited;
○ 4 has a draft limitation;
○ 5 at the berth;
○ 6 is shallow;
○ 7 conducts fishing;
○ 8 in sailing;
○ 9 to 14 - reserved for future use;
○ 15 is not defined (default setting).
- Destination - The next port of destination of the ship (no more than 20 characters).
- ETA is the expected time / date of arrival at the destination (indicating the UTC time).
- Draft - The maximum actual static draft with an accuracy of 1/10 meters.
- Type of vessel and cargo - choose a two-digit numeric code from Tab. 8. If the second digit is [n], the corresponding code for the second digit must be selected from Table. 9.
- Crew - the number of crew members on board (optional).
Confirmation of correctness of operation
After the introduction of vessel identification data and flight data, the transceiver starts normal operation. To complete the installation, the following validation check must be carried out:
- Exit the system menu and return to the main operating screens. Press the 'Display' button until the "Own Dynamic Data" window ("Dynamic Own Ship Data") opens.
- Check that the reflected location, course, speed and direction are correct,
- comparing with the information on the position source displays and other data sources.
- Make sure that the status icon 'OK' is displayed and that the 'TX' icon flashes periodically.
- If the ship is in the area of other vessels equipped with AIS, press the 'Screen' button until the 'List of targets' screen appears. Be sure to display information received from other AIS equipped ships.
Article The purpose of the AIS can be read here >> " Appointment of the AIS "