 +7 (812) 4-673-673
How to better set up Marine Radar to display ideal targets
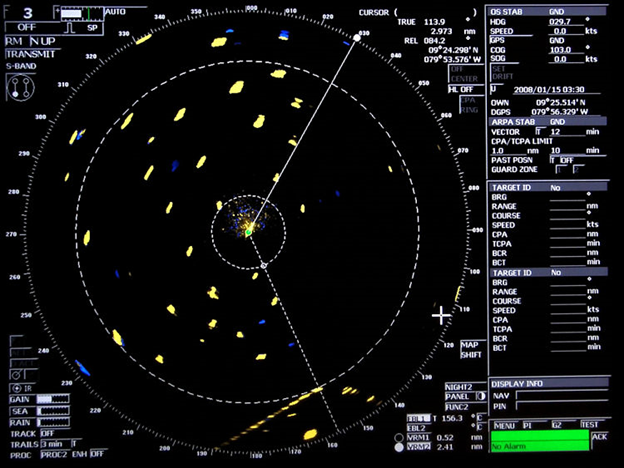
Radars on board are probably the most commonly used equipment during navigation. This is a good tool for observing the environment. We are so dependent on the radar that sometimes we use it more than our eyes to look out. But radar is also the most underutilized equipment on board.
In most cases , only three controls are used to set up the radar: gain, sea, and rain. And when we do not use all the controls to set the image, the image may look cluttered.
What is the best way to use radars to get the perfect picture of all targets?
Basic radar operations
The radio wave is transmitted and received by the scanner. The time is calculated between transmitting and receiving this wave. The speed of the radio wave is known, and thus the receiving unit calculates the distance to the target. After processing, this information is displayed on the display screen. The rotating scanner also calculates the bearing of the target, which is also displayed on the radar screen.
What is Radar Resolution
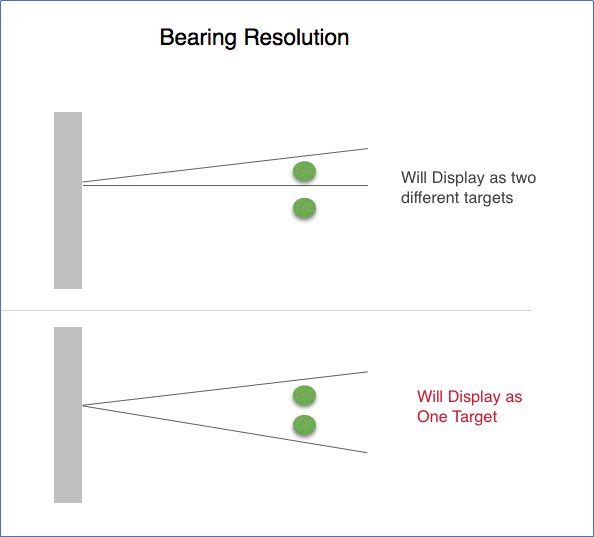
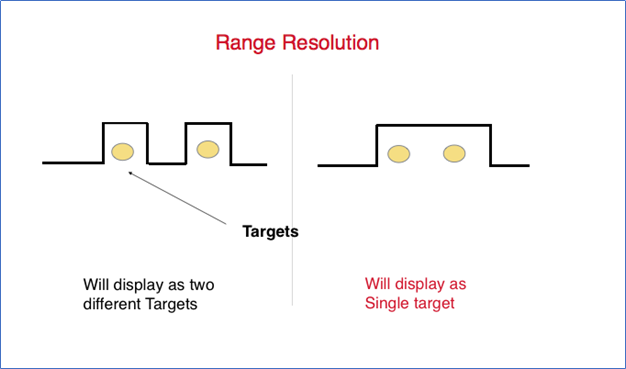
Radar resolution is the ability of a radar to show two targets that are close together, like separate targets on a radar. There are two types of radar resolution: range resolution and azimuth resolution.
A better azimuth resolution means that the radar can draw two close targets on the same bearing as separate ones.
The azimuth resolution depends on the horizontal beam width of the radio wave.
In the same way, better azimuth resolution means that the radar can draw two close targets (in different directions) as separate. Range resolution depends on pulse duration
What is Sensitivity
Radar sensitivity is how accurately the radar maps targets. Better sensitivity means that the radar can even paint a fishing boat as a small target. Less sensitivity means that fishing boats may not be displayed on the radar screen.
What is the best way to set a radar to perfectly display targets?
1) Amplification, sea and rain
These controls are used very often. But still a few words about them.
- Gain is used to increase the sensitivity of radar reception. It must be adjusted to the level at which targets are visible, but there are no other interference on the screen.
- Sea control is used to reduce the echo of interference caused by the sea surface.
- Rain control to reduce the echo of noise caused by rain.
But to what level do you need to configure these three controls? For example, will the levels of the full “Gain” and half of the “Sea” color the targets with the same clarity as the half “Gain” and the zero level of the “Sea”?
We should only use sea control when we have a moderate to stormy sea or when we think that the interference on the radar is caused by the state of the sea. Otherwise, we should not use it. In a calm sea, if we see unrest, it is better to reduce the gain than to increase control over the sea. Moreover, we should not try to eliminate long range interference with Sea control. This is because interference from the sea will only be at close range.
The correct way to set these controls is as follows:
- Increase gain to maximum.
- Reduce control of the sea and rain to a minimum.
- Reduce the gain to a level where the maximum noise is simply removed and the targets can be distinguished.
- If necessary, increase control over the sea to reduce sea clutter near the center of the screen.
Impulse length
The pulse length can be set to short, medium or long pulse. Most radars automatically adjust the pulse width according to the selected range. But knowing the pulse length can help set up the radar in such a way that the targets will be displayed more clearly.
What each pulse width does:
- Short pulse: as indicated in the section on azimuth resolution, it offers the best range resolution. But since the pulse length is short, the sensitivity of the short pulse is less compared to the long pulse.
- Long pulse: has a lower range resolution, but better sensitivity.
- The average impulse is between a short and a long pulse.
A long impulse can draw two close targets as one. The intended targets also have a larger diameter.
Ideally, short pulses are used at short distances (up to 3 nm), and long pulses are used at large distances (more than 12 nm). But we can use a short pulse at a great distance and vice versa.
For example, in a heavy traffic area, if we use a radar at a great distance, we can use a short pulse to prevent targets from overlapping.
Similarly, in fishing traffic, we can use a long pulse at a short distance. This will ensure that the goals are applied as more visible.
Amplification, sea and rain, and pulse duration are common settings on all radars. In addition, there are a number of other settings specific to the radar installation. These settings help you get the perfect picture on the radar. Let's see a few of them on the JRC radar.
PROC Setup
On JRC radars, it is possible to select processed videos. There are a number of options from Proc 1 to P roc 3 and then to turn off the settings for the processed video.
This function determines the speed of processing and displaying the target on the radar screen. When a shorter range is set on the radar, targets move faster on the screen. Thus, the radar processor has less time to process fast moving targets. This setting adjusts the processor speed to quickly and accurately draw fast-moving targets.
Setting PROC 1 processes targets faster than setting PROC 2 and PROC 3.
When setting PROC 1, faster moving targets are not skipped on the screen.
As targets move faster on the radar screen in a lower range, PROC 1 is used in a range of 1.5 NM or less.
Similarly, PROC 2 is used for the 1.5 nm and 3 nm ranges.
We must use PROC 3 when the radar is in the range of 3 NM or higher.
To set the level of the processed video, simply click on the PROC tab in the lower left corner of the JRC radar. If installed correctly, this can reduce unwanted interference from the radar to some extent.
Radar interference
This control reduces interference caused by radar signals. This is the internal interference of the radar, and not because of any external factors. This interference is mainly concentrated near the location of the ship on the radar.
Enabling IR control reduces these internal radar interference.
IR can be turned on / off by clicking on the IR tab in the lower left corner of the JRC radar.
Tests performed if the radar does not hit the target the way you want
If, even after all these settings, you think that you are missing some targets, or if the radar is not capable of coloring the target with sufficient sensitivity, you can perform some of the tests to check if everything is OK with your radar.
Radar Performance Test
A radar performance test checks the transmit and receive power of a radar. For example, if the transmit power of the radar is insufficient, it may not draw part of the target at all. Or the radar can only draw targets with very low sensitivity (weak echo).
On the JRC radar, to run a performance test, go to the Test menu. Select PM on. This will change the range of the radar to 24. Increase the gain to full, and you can see the train on the radar. You can also see the menu in the lower right corner of the radar. Measure the maximum loop range on the screen and check the length of the strip.
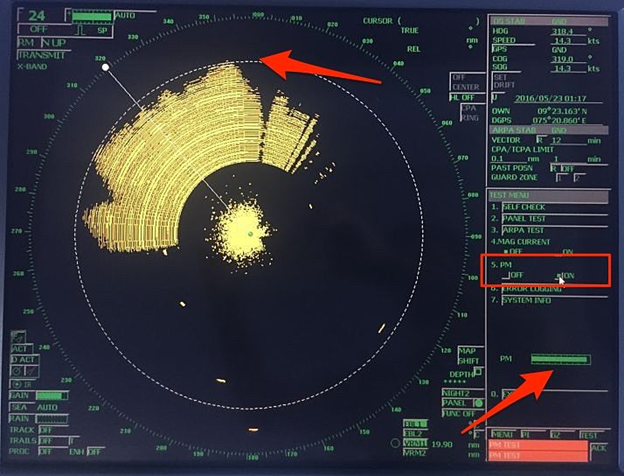
On JRC radars, the loop range represents the receive power and the band length represents the transmit power.
These values must be compared with real reference values when the magnetron was new. You can find these values on a sticker usually pasted on radar equipment.
But it is possible that you either will not find this sticker, or you can find the sticker without any meaning on it. This is especially true when the last magnetron was replaced by shipboard personnel. If you did not find the initial values, take the maximum values for which the power loss is zero on the graph.
We need to compare these values with the initial ones in the graph given in the manual. These graphs (called calibration curves) differ for the power of the receiver and transmitter.
Comparing the actual length of the loop with the initial length of the loop, we get losses in the receiving system. This loss is called sensitivity deterioration.
If the transmit power is less, the radar may not draw targets at a farther distance. If the sensitivity of the receiver is less, the radar can draw targets with a faint echo on the screen.
In case of lower receiver sensitivity, we can use Long Pulse and ENH in all ranges to increase the sensitivity until a technician finds a radar.
If the ship’s personnel changes the magnetron on their own, they may not detect changes in the operation of the radar after replacing the radar. This is due to the fact that after changing the magnetron it must be configured. Shipboard personnel must go through the setup procedure from the manufacturer or call a technician.
Magnetron current
Even if the result of the monitor's performance test is not very good, it is possible that the magnetron is in working condition. The problem may be related to the monitor unit itself.
Therefore, before changing the magnetron, we can check the magnetron current.
On JRC radars, click the Test tab in the lower right corner and turn on the Magnetron Current. Read the current magnetron reading.
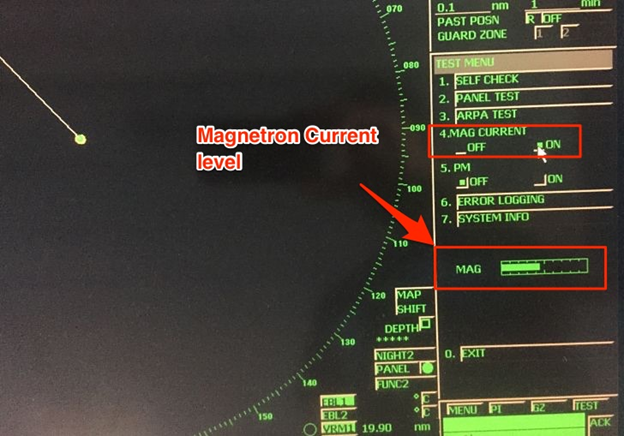
The magnetron current should be between 5 ~ 9.5. If the actual magnetron current is on the higher side of this range, the magnetron is fine. In this case, we can contact a service technician to check (or replace) the PM module.
Conclusion
The radar must be tuned in such a way that all targets are applied perfectly, it is just as important as using the radar itself.
Although the tuning procedure can vary significantly with each type of radar, it is important that you know how best to configure the radar. Set up so that you don’t miss a single target on the screen, no matter how small it is.
Settings should be tested to know which ones work when.