 +7 (812) 4-673-673
New Gyrosphere Container Mod.10 / 4 for Sperry Marine NAVIGAT Gyrocompass
This article provides information about the new gyrosphere container mod 10/4 and its installation in existing gyrocompass models. It can be used with existing mercury-free gyrospheres (Type 5000 with numbers 074829-0000-000 (regular type) and 074831-0000-000 (type HSC).
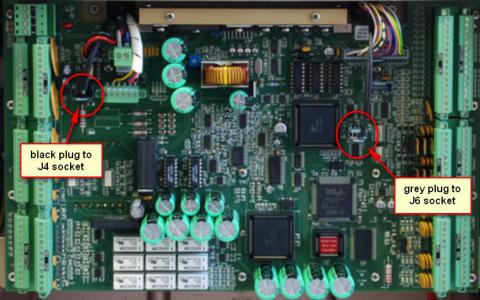
The new Mod.10 / 4 container uses camera-based optical capture technology to determine the position of the gyrosphere in the container. Since this technology involves the transfer of data to the MK1 main circuit board, hardware modifications and software updates are required. In addition, a special adapter cable (adapter) through a previously unused J6 connector is required to connect to the main circuit board.
NAVIGAT 100 and 200 models require a software update to version 1.215 or higher. It is also necessary to place the red 4-core cable of the base board from J3 (analog) to J4 (digital) on the main circuit board. In addition, the third S3 switch of the DIP switch on the main circuit board must be set to the ON (up) position.
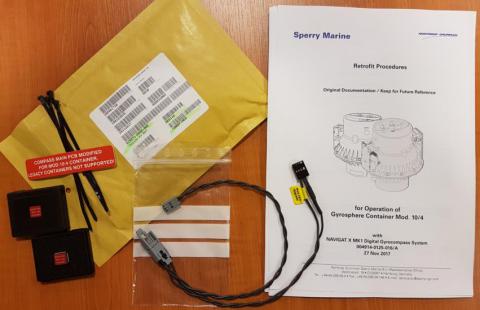
NGSM have released a special NAVIGAT X MK1 upgrade kit (part number 025971-0000-000), which contains the necessary materials to modify and support the Mod.10 / 4 container.
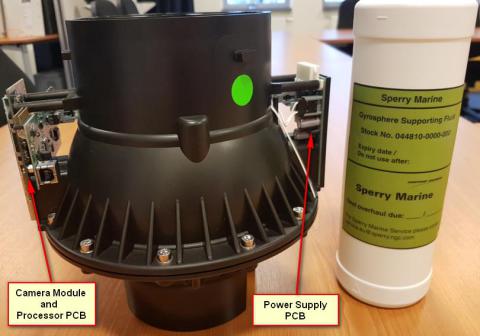
It includes a new maintenance fluid in a bottle with a green label
(stock number 044810-0000-000).
Important notice: Before upgrading the NAVIGAT X MK1, make sure that the current version of the base plate (P / N 022407) and the current version of the main circuit board (P / N 020672) are installed in this device. Older models of the baseboard and main circuit board are not supported for updating with the new Mod.10 / 4 container upgrade kit. Also note that after the modification is completed, it is not possible to use the previous container type, for example, Mod.10 / 3 or older, in this gyrocompass .
Very important: do not remove the printed circuit board of the camera module with the silver metal case from the container assembly, as it is precisely aligned during production.
When upgrading a NAVIGAT 100 or 200, the following work must be done:
1. In order to prepare NG100 or NG200 for working with mod 10/4 container, it is necessary to update the main board software to version 1.215 for CSU and 1.216 for CCU (or higher). For NAVIGAT 200 CompassNet systems, you must also update all other devices, DDU, NAVITWIN V, and CAU processors in the system to version 1.215 (or higher).2. When all updates are successful, turn off the gyrocompass by disconnecting TB1 and TB2 of the main board.
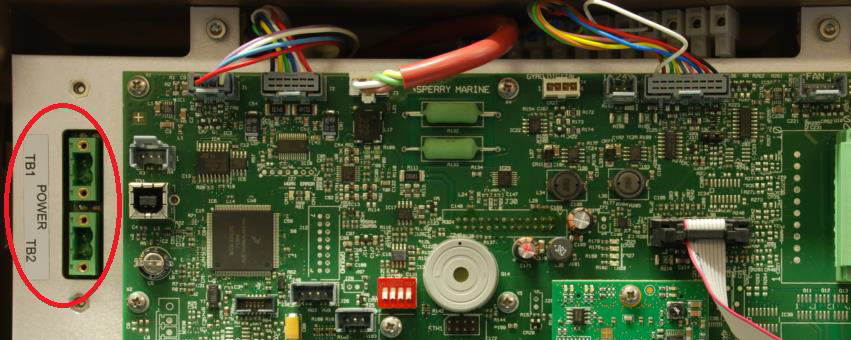
3. Set the plug from J3 (analog gyroscope) J4 (digital gyroscope) and DIP switch S3 to the ON (up)

position. 4. Correct position of the plug and DIP switch for 10/4 operation mode.

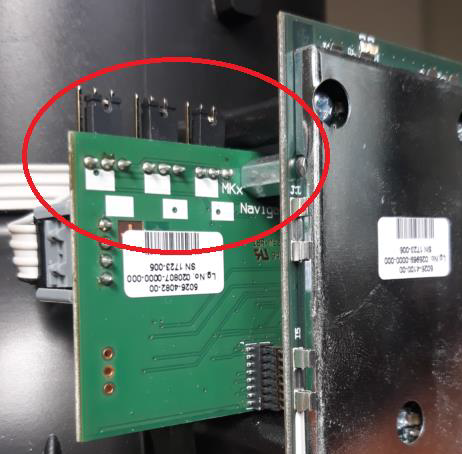
5. Correct the jumper setting on the Mod.10 / 4 container processor board for operation in NAVIGAT 100/200
6. Finally, the new Mod.10 / 4 container should be installed in place of the Mod.10 / 3 container, and should be filled with new support fluid with a green label.
7. After the new container has been correctly installed and connected, turn on the gyrocompass. If, after 5 minutes of operation, the heading value is still not indicated on the display unit and the container has not completed any turns to align with the sphere, perform a power cycle and check again.
8. To confirm the correct operation after the upgrade, perform a new contact ring test in the service setup code 998. NOTE! During this test, the gyro does not send course data. The test takes 2.5 minutes and rotates the container at a speed of 5 ° / sec a full turn forward and backward. During this rotation sequence, the sending of serial data from the Mod 10/4 container through the base board to the main circuit board is checked. This test should be done 3 times.
When updating the NAVIGAT X MK1, the following work should be done:
1. Install adapter cable on J4 plug of red cable
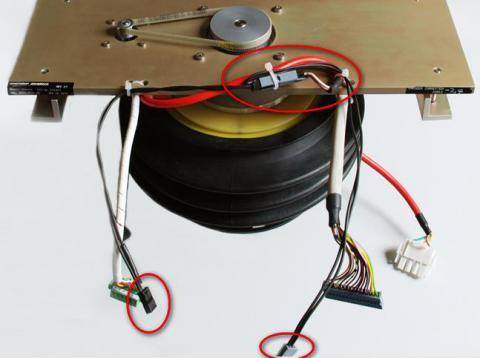
2. Removing resistors R104 and R105 and updating SW to V2.003 (red mark)

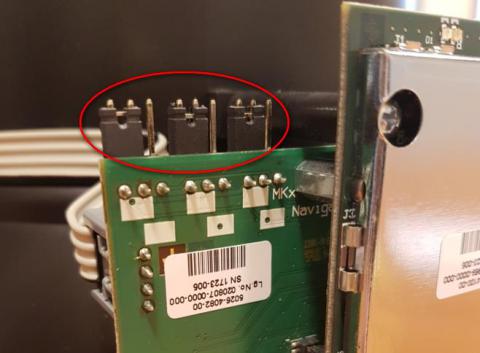
3. The correct jumper setting on the board of the processor processor of the Mod.10 / 4 container for operation in MK1 (MKx upper setting)
4. Reconnect all cables and the new cable adapter connectors to J6 and J4
The new container mod. 10/4 should be assembled like a container mod. 10/3 and filled with new support fluid from the bottle with a green label.
After the new container is correctly installed and connected, turn on the gyrocompass. If, after 5 minutes of operation, the display does not show the heading value, and the container has not completed turns to align with the sphere, perform a power cycle and check again.
In addition to the upgrade procedure, NGSM released a new detailed installation and maintenance manual (document number 5000-0125-003) for the new Mod 10/4 container, which is available on the manufacturer's website.
To upgrade NAVIGAT X MK1, you need to order the following 3 items:
1. GYROCONTAINER / 10/4 KIT, consisting of:
- Gyrosphere Container Mod. 10/4
- Support fluid for Mod. 10/4 (green mark)
2.025971-0000-000 UPGRADE KIT for MK1 Mod. 10/4, consisting of:
- Adapter (cable)
- EPROM Software V2.003 Rev A (red label)
- Set of labels for the case, cable strips
3. 4914-0125-16 Retrofit instructions in paper version